GeniusWebPython
GeniusWeb is an open architecture for negotiation via the internet. The core of the architecture is a JSON based communication protocol that standardizes the communication messages comprising a negotiation. General info on GeniusWeb, including tutorials, can be found on the GeniusWeb main page.
This project contains a c-python-3-based implementation of GeniusWeb core objects. It allows easy (de)serialization of many data structures needed for negotiation in GeniusWeb.
Python in general is about 100 times slower than java. For small domains, up to 10 million bids, this is usually no problem. But for larger domains we recommend using the java version of GeniusWeb. |
Installation
pip install https://tracinsy.ewi.tudelft.nl/pubtrac/GeniusWebPython/export/93/geniuswebcore/dist/geniusweb-2.3.0.tar.gz
You only need python and a venv with GeniusWebPython for just writing and compiling your parties, and for debugging them with the simplerunner. You can also just use Eclipse or another IDE of your choice. No further installation is needed. If you copy an example party, the setup.py script contains all dependencies. |
We require a complete python installation, including pip and venv support. Some python installations do not include pip and venv support. You may have to install these separately. |
To compile and test parties you need python (3.8, 3.9, 3.10, 3.11). Newer versions have not yet been tested. We recommend using an IDE for development and debugging, such as Eclipse with PyDev or PyCharm. GeniusWeb has full type annotations.
You can run python parties with the stand-alone runner. But for serious applications we recommend using the server-based setup. Your python parties are then placed on the GeniusWebPythonPartiesServer. Check GeniusWebServers for more information.
Security considerations
GeniusWebPython assumes python parties are packaged using the standard tar.gz distribution format used by Python. This implies that the package is not fully self-contained: it requires dependent libraries to be installed separately, according to setup.py included in the package. This dependency on later installation steps poses an additional security risk compared to the fully self-contained java jar packaging.
Overview of the available core objects
All classes in geniuswebpython are exact copies of their java counterpart. Please refer to the Geniusweb documentation for detailed explanations. Additionally, please consult the extensive documentations in the classes.
The SimpleRunner has a few minor differences, its usage is discussed below.
The partystdio class is unique for the GeniusWebPython system. It contains some glue code to make parties communicate through the stdin/stdout streams. This is special code used only for the GeniusPythonPartiesServer and you should not need this.
Example Parties
Example parties can be found here. Many of these are also included with the parties server to provide basic functionality.
All example parties are stand-alone projects that can be compiled, tested and used completely independent as-is. RandomParty may be the best starting point for your own party as it does everything "from scratch" and supports a lot of protocols.
The Time Dependent Party is special. The python code you see in geniusweb/ and test/ is automatically generated from the corresponding Java code. The only "real" code in this project is translatorTest.java. This code generated dist/timedependentparty.tar.gz and all the other files .
All example parties have identical behaviour and parameters as their original java-based versions. Please check the java documentation for details.
Writing a party
Example parties can be found here. You can easily clone a party with SVN using svn co https://tracinsy.ewi.tudelft.nl/pub/svn/GeniusWebPython/exampleparties/randomparty/ (this clones randomparty, use a different name to clone another example).
As mentioned above, TimeDependentParty is special and therefore should not be used as start point for your own party, unless you know exactly what you are doing and want to translate a java-based party. If you want to extend TimeDependentParty, copy for instance Conceder. |
After cloning, create your venv and install the requirements, eg
cd randomparty
python3 -m venv venv
source venv/bin/activate
pip install -r requirements.txt
You can now run the junit tests and debug your party.
You may have to take different or additional steps if you use an IDE like eclipse with pydev, or pycharm.
The basic structure of a party that supports the SAOP behaviour looks like this:
class RandomParty (DefaultParty):
  """
  Offers random bids until a bid with sufficient utility is offered
  """
  def __init__(self):
    self.__lastReceivedBid:Optional[Bid] = None
    self.__me:Optional[PartyId] = None
    self.__random:Random = Random()
    self._profileint:Optional[ProfileInterface] = None
    self.__progress:Optional[Progress] = None
    self.__settings:Optional[Settings] = None
    self.__protocol:Optional[str] = None
    super().__init__()


  def notifyChange(self,info:Inform) -> None:
    try:
     if isinstance(info,Settings):
       sett:Settings = cast(Settings,info)
       self.__me=sett.getID()
       self.__progress=sett.getProgress()
       self.__settings=sett
       self.__protocol=sett.getProtocol().getURI().getPath()
       self._profileint=ProfileConnectionFactory.create(sett.getProfile().getURI(),self.getReporter())
     elif isinstance(info, ActionDone):
       otheract:Action = (cast(ActionDone,info)).getAction()
       if isinstance(otheract,Offer):
         self.__lastReceivedBid=(cast(Offer,otheract)).getBid()
     elif isinstance(info, YourTurn):
       self.__makeOffer()
     elif isinstance(info, Finished):
        self.terminate()
     else:
        self.getReporter().log(logging.WARNING, "Ignoring unknown info "+str(info))
    except BaseException as e:
      raise BaseException("Failed to handle info") from e
    self.__updateRound(info)


    def getCapabilities(self) -> Capabilities:
        return Capabilities( set([ "SAOP", "Learn"]), set([Profile]))

    def getDescription(self) -> str:
        return "Offers random bids until a bid with sufficient utility is offered"

    def __makeOffer(self) -> None:
      if (((self.__protocol == "SAOP" or self.__protocol == "SHAOP")) and
              self.__isGood(self.__lastReceivedBid)):
        action=Accept(self.__me,self.__lastReceivedBid)
      else:
        ... compute good next bid...
        action = Offer(self.__me, bid);
        self.getConnection().send(action)

    def __isGood(self, bid:Bid)->bool:
        return self._profile.getProfile().getUtility(bid) > 0.6
Notice, above is simplified code, for fully working code check the source code.
A notifyChange callback directly provides Inform, and the party can send Actions into the connection. This allows proper type checking of all the Party's code, and saves the programmer from interpreting JSON structures.
The party must follow the behaviours that it promises. The example above follows the SAOP behaviour.
Use the logger for outputting messages from your party.
Do not use stdin and stdout/print in your party. These are used for communicating with the partyserver. Using them will disturb that communication and most likely result in your party requesting illegal actions. Executing an illegal action will result in your party being terminated by the protocol. |
Compilation, Deploy
If you want to deploy your party on your PythonPartiesServer you need to compile your party. Compile with python3 setup.py sdist. This gives you a you get a dist/yourparty-X.Y.Z.tar.gz
To deploy, you can copy the targz into the pypartiesserver/webapp/partiesrepo/ on the PythonPartiesServer for deployment. The partiesserver automatically detects new and changed files and updates their status immediately.
Make sure that you update the setup.py: the name, packages, install_requires etc all may have to be updated, depending on what you changed in your project. Also notice that compilation takes all dependencies from the setup.py. It ignores your requirements.txt file.
Logging
By default a DefaultParty logs to the file /tmp/<PARTYCLASSNAME>XXX.log where /tmp is the temporary files directory, XXX is some arbitrary string of digits that make the log file unique, and <PARTYCLASSNAME> the party's class name. This is usually a convenient place, also if the party runs on a server. The log file name can be set to something else by calling setReporter.
Throwing exceptions
A special warning is in place regarding throwing exceptions from your implementation, particularly from notifyChange. In line with the general Listener interface, exceptions are only logged and your party usually is immediately disconnected if it throws any exception. Make sure that you free up any used resources to avoid memory leaks if you really need to throw an exception.
Preparing the tar.gz file
Your party has to be packaged as a standard tar.gz file for deployment on the pypartiesserver.
The pypartiesserver runs a standard pip install <your.tar.gz> to install your party for use.
In contrast with java, python tar.gz files do not contain their dependent libraries. Only web links to the dependent libraries are stored in the setup.py program inside the tar.gz file. They will be downloaded at installation time.
Your tar.gz file must contain a party.py file in the root of the project, defining a function party() that returns your main class, like this:
from randomparty.RandomParty import RandomParty
def party():
    return RandomParty
Of course you should replace RandomParty with your party's main class name but the file name must stay party.py.
Refer to install new party to deploy your party.tar.gz on the pythonpartiesserver.
Using PyDev in Eclipse
We recommend you use an IDE, eg Eclipse or PyCharm, to develop your python parties. Configuring Eclipse is quite elaborate, here is an outline but check other tutorials and videos (eg our own tutorial video) for more details.
- Start Eclipse and select your workspace
- Install PyDev. Go to Eclipse MarketPlace and search for PyDev. Click on Install and follow the instructions.
- Download an example project as usual in Eclipse:
- Install an SVN client if you don't have one installed. Go to Eclipse MarketPlace and search for subclipse. Click on Install and follow the instructions. Also follow the javahl installation instructions. This will involve separate software as well.
- Import the project:
- click File/Import/SVN/Checkout Projects from SVN. Click Next,
- select Create a new repository location and Next. Enter e.g. https://tracinsy.ewi.tudelft.nl/pub/svn/GeniusWebPython/exampleparties/randomparty.
- Select the root folder and Finish.
- Select General/Project, Next, enter some project name "demo", Finish
- Create a virtual env for python
- open terminal
- Go the project workspace
python3 -m venv venv; source venv/bin/activate; pip install -r requirements.txt
- Set up Eclipse env
- Window/Preferences/PyDev/Interpreters/Python Interpreter
- New/Browse for python/pypy.exe
- Browse to the venv/bin/python3 file you created
- enter interpreter name, eg your project name "demo"
- check also the site-packages and click OK
- PyDev/Editor/Code Analysis/Mypy and check "Use Mypy?"
- Apply and close
- Configure your project
- Right click on demo project in navigator or project explorer
- PyDev/Set as PyDev Project
- Right click on demo project in navigator or project explorer and select "Properties"
- Select PyDev/PyDev Interpreter Grammar
- Select the Interpreter "demo".
- Click on PyDev-PYTHONPATH
- Click Add source folder and select the demo folder (the root of the demo project)
- Go to PyDev/Editor/
Your party is now ready for programming. For instance you can run the unit tests by right-clicking the test folder and selecting Run As/Python unit test. Place a breakpoint and use debug instead of run to debug your party.
Stand-alone running
The standalone runner is available in geniuswebcore 2. Stand-alone running works similar as the java stand-alone runner. .
- The parties you want to run must be python-based (using GeniusWebPython, not GeniusWeb) and in your pythonpath. Typically by adding them to your PYTHONPATH environment variable.
- The profiles and settings you want. To get them, you can do this:
- do
svn co https://tracinsy.ewi.tudelft.nl/pub/svn/GeniusWebPython/geniuswebcore/test/resources - Copy the profiles (eg the entire jobs directory) you want to use to your project
- Copy a settings.json to your project.
- do
- Edit the settings.json file:
- Change the parties to your local party as needed. Party references are URIs, starting with pythonpath: followed by the full.class.name. All parties must be in your python path.
- Change the profiles as needed. Profiles are URIs, starting with file: followed by the full/file/path (either absolute or relative).
- parameters contains a json dict with additional initialization parameters for each party. They are a json dict, with strings as the key and any json object (but usually a string or number) as value.
- Run
python -m geniusweb.simplerunner.NegoRunner settings.json.- To do this from Eclipse, ensure your python3 venv is visible in the package explorer and browse to venv/lib/python3.8/site-packages/geniusweb/simplerunner/NegoRunner.py
- The log will be written to stdout by default.
- Extract the data from the line
INFO:protocol ended..:. It's a json structure with the final state of the session. You can easily parse it to a python dict using pyson.
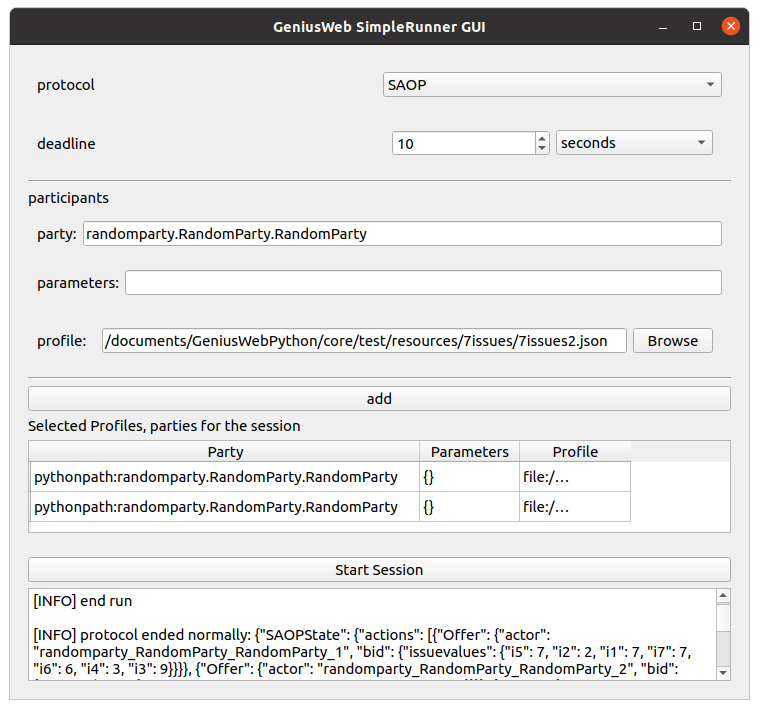
With the SimpleRunner GUI
If you do not provide settings and just run python -m geniusweb.simplerunner.NegoRunner, you get the GUI to enter your settings. It looks like this

It works just like the SimpleGUI in java:
- Enter the class path of your party without the leading
pythonpath:, for exampletest.testparty.TestParty.TestParty - Enter the parameters as json dictionary without the enclosing curly's, eg "persistentstate": "a48b8bc9-4275-4a4e-bee9-6c0a734dc99a", "negotiationdata": []
- Enter the profile without the leading
file:, egsrc/test/resources/jobs/jobs2.json
Limitations
SimpleRunner has a number of restrictions, compared to a run using a runserver and partyserver
- With stand-alone runner, your parties are run together in a single python interpreter. This implies
- there may arise library version conflicts between parties. You will have to somehow resolve these to get the parties working together properly. If you can not resolve the conflicts, your only option is to use the server based runner.
- There may be multithreading effects due to the python GIL.
- You can only use GeniusWebPython-based parties, not GeniusWeb-based parties
- Not all protocols are translated to python yet. You can only use protocols that have been translated.
- These issues are resolved by using the partiesserver. Therefore SimpleRunner in python might behave slightly different from running on the python-partiesserver. For this reason the partiesserver will be used for competitions and tests. Always make sure that your party runs properly also on the pythonpartiesserver.
Debugging
For debugging you can use the normal python debugging facilities from your IDE (eg Eclipse PyDev). E.g. place a breakpoint in your code, and then run the unit test that reproduces the issue. The IDE switches to your program and you can step, inspect variables, etc.
You can run your party best from a unit test, so that the fault situation is easily reproduced. But you can also use the simplerunner to run a session against some other party.
GeniusWebPython sources
You can browse the GeniusWeb core sources directly using the browse button at the right top of this page.
You can download the source code of this component using
svn co https://tracinsy.ewi.tudelft.nl/pub/svn/GeniusWebPython
Normal developers that write new parties do not need to install the GeniusWeb source code. Even if you want to debug/trace into the GeniusWeb code -- for instance for debugging or understanding the inner workings of geniusWeb--, IDEs like Eclipse automatically allow this as the pip-installed libraries contain sources.
The tests you find in the svn repo can not be run directly because python can not handle duplicate package names. All the python code and the |
Building from source
- Check out as above using the
svn cocommand - Check out GeniusWeb with
svn co https://tracinsy.ewi.tudelft.nl/pub/svn/GeniusWebin a separate place on your machine. - Fix the
GENIUSWEB_SOURCE_DIRin TranslatorTest.java to match the geniusweb checkout location. - run the TranslatorTest. You probably get an error
- run the TranslatorTest again. Now it should succeed.
The error in the first test run is because the test must copy the geniusweb source code to the project space. Most IDEs compile this code only after the test is completed.
Attachments (2)
- Screenshot from 2022-02-16 15-57-46.png (82.1 KB ) - added by 4 years ago.
- simplerunner.png (82.1 KB ) - added by 4 years ago.
Download all attachments as: .zip